Monday, December 26, 2011

Kitchen update!

When last we left our (kitchen) hero she was looking a little like this:


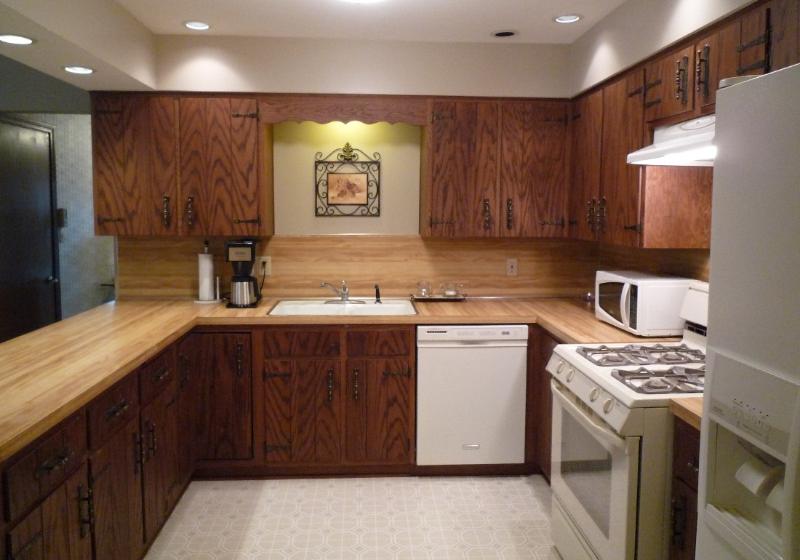
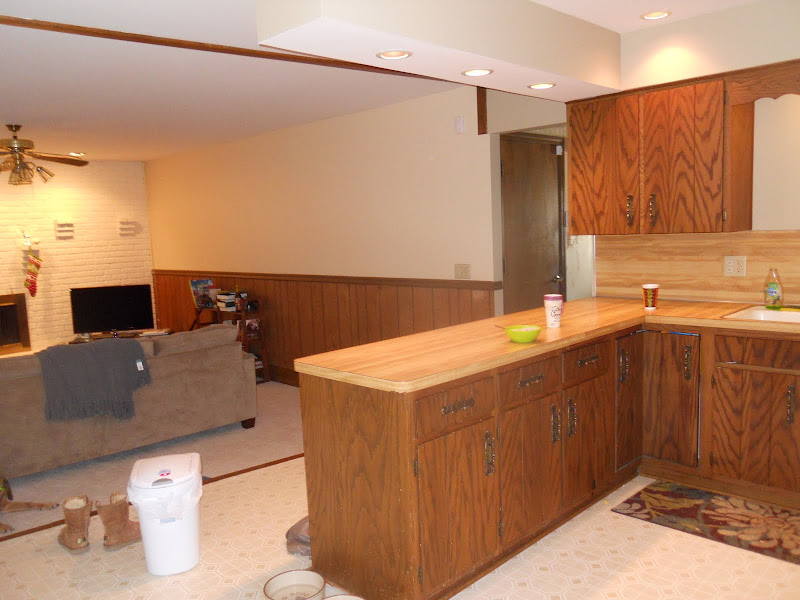
(actually, if you remember, those crazy brackets on each corner of each cabinet had already been ripped off)


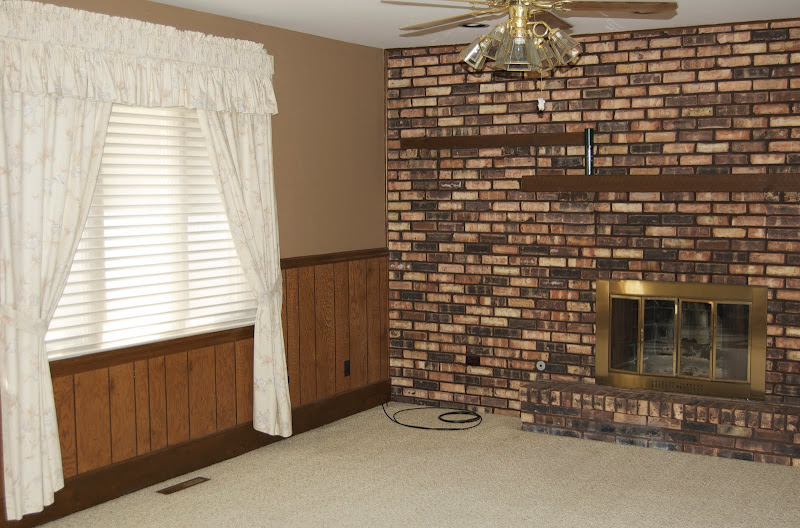
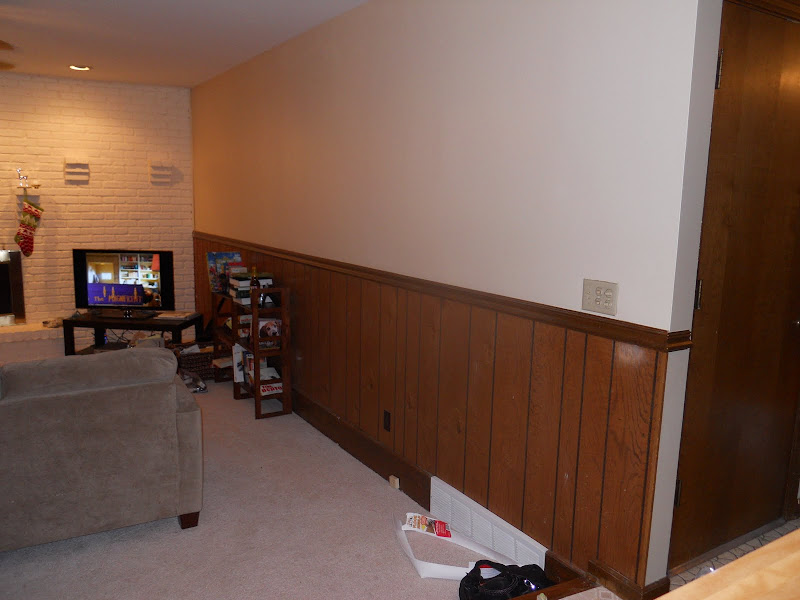
And if you recall, here's a before of the den before we painted the fireplace and the upper portion of the walls:


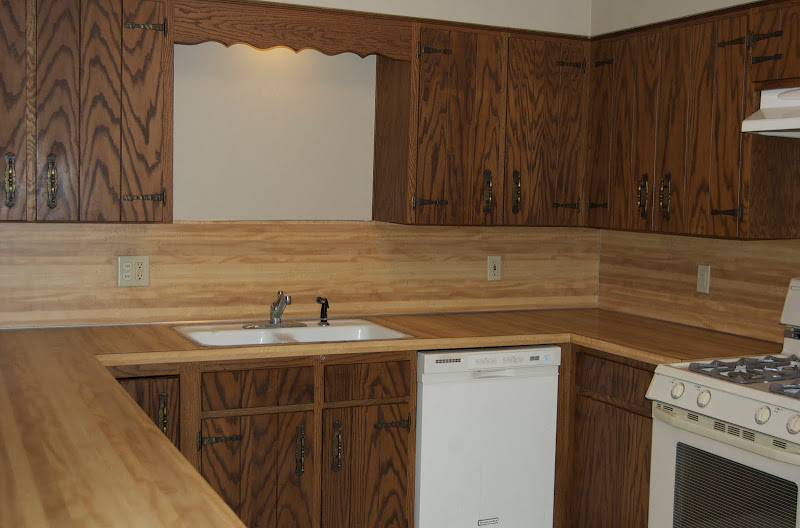
More kitchen (with the crazy lantern light fixture):


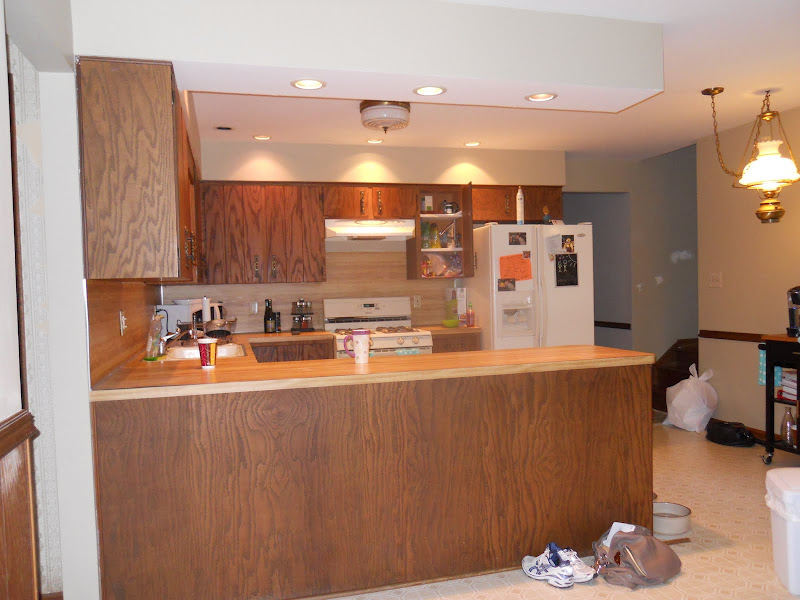
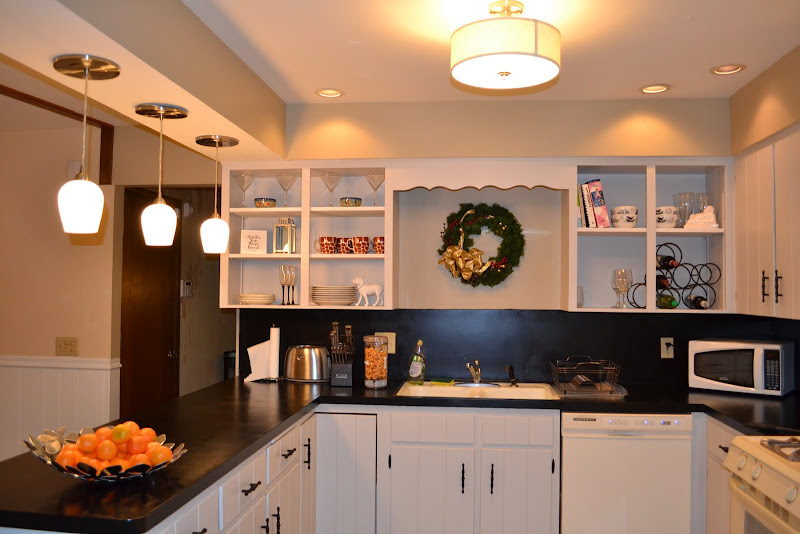
View from the kitchen after the upper portion of the walls and the fireplace were painted:

Here's the breakdown of what we did to the kitchen:


  • Painted the cabinets a light grey


  • Spray painted the existing cabinet hardware (to save us roughly $250)


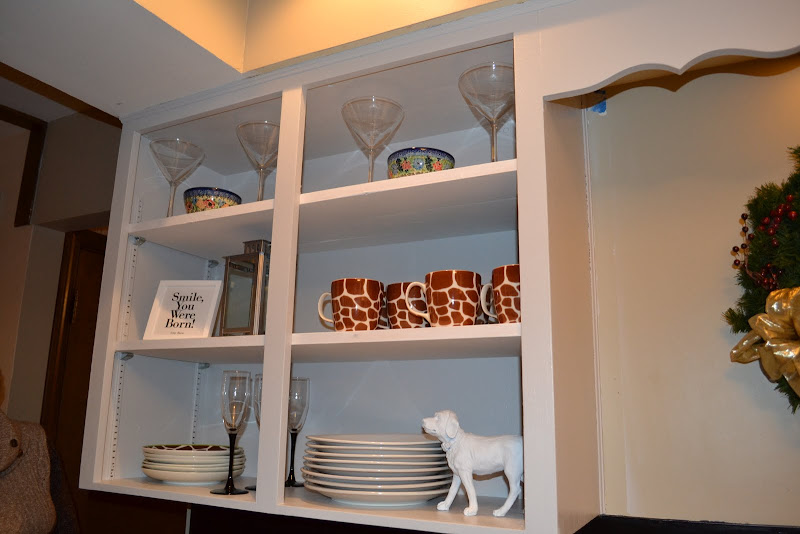
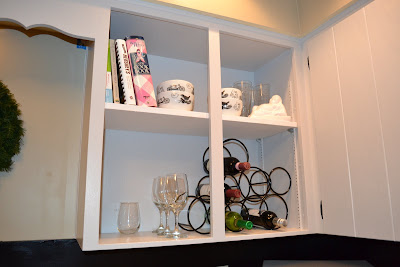
  • Removed the doors from the cabinets on the wall above the sink and installed painted slabs of wood for new open shelving


  • Painted the countertops with Rustoleum's countertop paint (and nearly died from fume inhalation in the process...but that's a different story in itself)


  • DIY'ed the pendant lights over the peninsula with a recessed light kit


  • Hired a handyman (Bruce is the man) to remove the crazy lantern light fixture and to replace the existing overhead light with a drum semi-flush fixture


  • Bruce also replaced the fan with a plain (and non-70s looking) white fan


  • Painted the bottom paneling in the den white


  • Added a rug from ikea and a few other trinkets


The whole thing cost under $500 (as opposed to the average $25,000 it costs for a new kitchen) and took us two weekends and work in between on the weeknights.

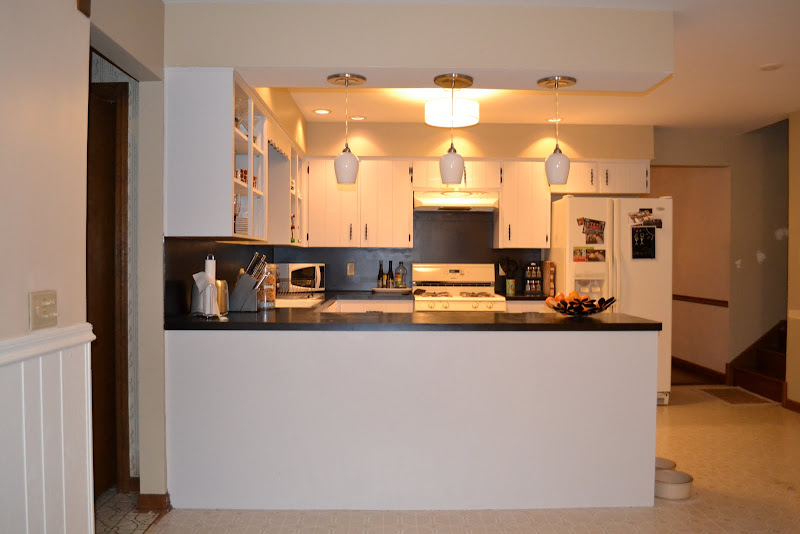
Aaaaand.....here are the afters!


Still left to do:


  • Paint the walls in the kitchen area to match the color on the upper level of the den area


  • Paint the trim around the window in the den (and the whole house for that matter--a painter is coming to give us a bid this week)


  • Get pieces of glass and install them over the brackets on the fireplace for 3 mantles


  • Spray paint the bookshelves either black or white


  • Get a coffee table and a media cabinet


  • Get a rug for the kitchen area


  • I'm sure other stuff we'll think of along the way :)


And of course eventually (maybe a year and a half or two) we'll plow the whole thing over and get a brand spanking new kitchen. But, for now, we love it and are just enjoying our hard work for awhile.


Sorry for the sparse description above, but its late and we have work tomorrow! We hope everyone had a very happy holiday!

Friday, December 9, 2011

Updating my grandparents' dressers

We are BACK after a major delay! I started a new job and had zero time to upgrade and/or blog.

But now, its time for a blog post close to my heart (not that they haven't all been, this is our first home, after all). When my Grandpa passed away in 2005 I inherited his bedroom set, which had been he and my grandmothers since likely the 60's or 70's (maybe even earlier, its hard to tell, though they looked like they were from that era--maybe my cousins could fill in the details here, if you're reading this Jenny and Amy!). To be 100% honest, before this year I wasn't interested in using the dressers at all because I thought they looked too old and dingy, and even pretty masculine, so they had just been sitting in my parents' basement (BIG shout out to our friends Pat and Amanda for helping us move them over here after a few beers at Three Floyds!). This is before I learned about the wonderful--and relatively easy--world of DIY furniture upgrades!

Here are some before pictures, which are a huge fail on my part. I had my camera all ready to go but then my mom and I (another HUGE shout out to Mom for all her help) got excited and started painting before I remembered to take the pictures. So we halted for a second while I snapped some photos that will have to make do.


See? Brown, dingy, depressing. Totally hip for the 70s though! Extra bonus? I found some of my grandmother's things in the drawers (she passed away before I was born so it was especially awesome to find pieces of her).

I wanted to keep the dressers' style vintage-y to embrace their (gracefully) aged look. So after some internet research I settled on using Annie Sloan Chalk Paint (extra extra bonus? Dave's mom's name happens to be Ann Sloan, so the name made me smile). Its imported from England and only sold at a few locations in the U.S. I bought mine from Classic Wall Finishes at www.bestfurtniturepaint.com. They are a truly amazing company with amazing customer service. Patty is well known on the DIY blog circuit as an expert in the Annie Sloan line, and when I hit a snag in painting and didn't know how to proceed, I took a chance and called her. She spent 20 minutes on the phone with me explaining what to do and even gave me tons of tips on how to use this truly unique paint.

Here's why its unique--you don't need any primer (DIY geek swoon), it covers all kinds of surfaces, including wood, laminate, and even metal, and once it dries, you can "distress" it with a sanding block to get that vintage look. When the paint is dry, you cover the piece in Annie Sloan's wax to give it a nice sheen and feel. With my mom and I both working, two coats of paint took under two hours to apply. The hard part was the wax, which took probably 3 hours total to apply two coats (I did this part on my own). As Patty explained, you really have to push the wax into the piece and then wipe the excess away. I was legitimately sore the next day. The paint is fairly expensive, about $35 for a quart, but two dressers with two coats each only took about 3/4 of one can.

Without further ado, here are the pictures of the dressers! I ordered knobs from Anthropologie and the vintage looking pulls from www.pullsdirect.com.


(This next photo most accurately reflects the actual color of the dressers).


Thanks for reading!!! Major upgrade occurring tomorrow: we are painting the kitchen cabinets!


Monday, September 5, 2011

From Dark and Dreary to Chic and Cheery


We're back from a brief hiatus! And I have better pictures thanks to my mom letting me use her fancy camera. And not a moment too soon. I couldn't go much longer without sharing the above picture of our wacko dog (and Dave and I on our first night in the house) with the world.

Now, on to the more important stuff. When we moved in our family room/den area looked like this:


Pretty depressing, huh? The dark brick on the fireplace wall just sucked the light out of the room. To top it off, there were dingy, dark mauve colored walls, bottomed out by some (albeit real wood) wood paneling on the bottom. In short, it was not our favorite room to be in. In fact, we spend most of our time in the living room where our big TV and entertainment center is set up. However, its just off the kitchen and we really wanted it to be a place to chill out, entertain, and get cozy in the winter next to the fire. Not to mention the fact that we spend lots of time in the kitchen cooking, and we wanted something pretty to look at while we did.

So we googled around and found out how to paint a fireplace. Most blogs we looked at recommended an oil based primer if the fireplace was particularly sooty. Our wasn't, but it did have some grout that was crumbling off on the hearth so we didn't want to take our chances. We primed that with the oil based primer and finished the rest with a latex primer. This was the hardest part of the job because the porous bricks just sucked up the paint. Thankfully, my brother Jim was in town and was kind enough to assist with this phase in exchange for some of our hometown brew Three Floyd's. This part took about 3 hours.

Then, we finished it with a creamy vanilla colored, eggshell finish latex paint. This took a long time as well, making sure we covered up every single indication that there ever was a brown brick wall beneath. We were so happy with our finished product:

Its so lovely, isn't it? The difference is so remarkable. There is so much more light in the room and it looks a thousand times bigger. Can't you just picture sitting in this room in the winter with a fire going and a glass of red wine? It almost makes me excited for Winter. Almost.

We also had to do something about the brown walls. We wanted to go just a shade darker than the fireplace so that there was depth but no noticeable difference between the two. Because the fireplace was a whole wall, we wanted to make it seem like part of the room instead of its own statement. Lots of bloggers recommend a stark white for a fireplace, but we felt like a whole wall of bright white would make the space cold instead of warm and inviting.

This picture best illustrates the difference between the former wall color and the new one:


See what I mean about the walls being just a tad darker than the fireplace?

You might be wondering about these pedestals on the fireplace. They do look a tad weird just sitting bare. The former owners had long, thick, dark pieces of painted wood balanced on top of them which you can see in the very first picture of the post (my mom found out were not screwed in when she tried to use one to hoist herself up when she was helping me clean . . .
thankfully there was no fall). We plan on purchasing thinner pieces of wood on top of them that we've stained. We'd like to keep a raw wood look to make things look a little rustic, and put some bright accessories to keep the room cheery.

The next step will be to paint the wood paneling with Olympic's "delicate white" in a semi-gloss finish. It will be so nice to sit in a light and airy room. I guess we'll have to furnish it then. Hmmm.....

One more thing: See the lovely wood railing below? Dave (my hero!) ripped it out our second night in the house. It dated the house unbelievably and cut what would be a very large and open room in half. It had to go, so Dave pried it off with a hammer. I tried to pull it off by myself while he was at work, and suffered our first-in home injury. Rather than keep trying I let him do the rest. Here's the before (with the former owner's furniture):


When we pulled the banister off, to our horror, 40 years of accumulated dust, food, and even a few receipts needed to be cleaned up. Hope you're not eating, because this is the sticky mess we had to scrub, using no less than two canisters of Clorox Wipes:

Yum. Once that was done we were pretty happy. Now, the place looks like one big room.


Friday, August 26, 2011

Demolition Derby

No one has ever accused me of being a patient person. When we moved into our house Tuesday afternoon, I was absolutely itching to tackle, and rip down, some of the house's original decorative "accents." Some would have, oh, I don't know, started to organize the disaster situation going on in our family room:

But I decided that the far more pressing matter was to rip off the embellishments on the kitchen cabinets. Within 3 hours of moving in, I could no longer resist the burning temptation to claw them off with my bare hands. You can sort of see them in this picture below (taken from our realtor's website):


I wish I had a better picture of them, but my "before" pictures are on my mom's camera, who is out of town right now. Blogging FAIL; I promise to get better at this! Anyway, they were these small, metal embellishments that looked like they had been nailed on to the cabinet doors to look like fancy hinges. Only they weren't hinges, they were just cheap, old metal do-hickeys haphazardly attached for the sole purpose of torturing the psyche of future owners of the home. I found a screwdriver and pried them all off while Dave was still at work.


Then, I gave the cabinets a good scrubbing, a good Pledge-ing, added an area rug, some cute dishtowels (thanks Mom!), and one Supremely Handsome Dog. Now, it looks like this:


I think it looks much cleaner and at least a tad more modern, n'est-ce pas? Our future plan is to DIY paint the cabinets a nice cream color and replace the old hardware to give it a quick update, while we save up (or win the lottery) to completely renovate it for a nice, new kitchen (not DIY, we'll leave that one to the professionals). Something has to be done about these laminate floors too. I'm thinking DIY peel-and-stick tiles?

More updates to come soon, and hopefully I'll have some real pictures for you soon (the "after" pictures in this post were taken with an iPhone because I currently can't find my camera). We did one other quick, but major, demolition. Hint: it involves a smashed finger (mine), a hammer, the strong man who lives in the house (not Charlie), and culminates in cleaning 40 years of kitchen gunk.

Thursday, August 25, 2011

Welcome Home

We've recently purchased a 3 bedroom, 2.5 bath ranch in the suburbs. It was built in 1979, and while its been well cared for, it looks like it hasn't had an ounce of updating since then. This is the story of our slow, and sometimes painful, updating of the house. Like most young couples, we're on a budget, so we're going to DIY lots of projects and learn as we go.

Now, let us introduce the major players in this operation.


Julia and Dave:


Our Wondermutt, Charlie:


And, of course, the star of the blog, our Little Pink Home:


"Before" pictures to come this evening! But, here's a preview of the 70's tastic decor we are working with: