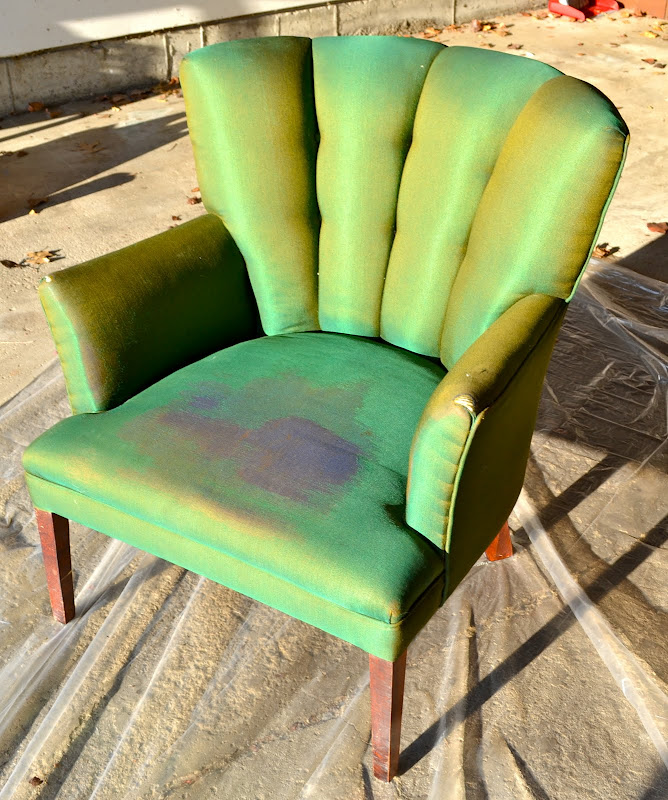
This is the story of how I transformed a chair that looked like this:

To this:

I saw a tutorial on Pinterest from Hyphen Interiors on how to paint an upholstered chair and was dying to try it. My grandmother's chair had been sitting in my parents' basement for as long as I can remember. I wanted to reupholster it but that would cost hundreds of dollars, so I thought I'd try the tutorial out. The worst case scenario was that I would mess up the chair and would have to reupholster it anyway. Either way, it was better than the chair continuing to sit around unused and collecting dust.
What you'll need:
- one quart of latex paint in the color of your choice
- one spray bottle for water
- one small brush (2 inches or smaller)
- fabric (aka textile) medium (at least 3 eight ounce bottles, available at JoAnn Fabric)
- acrylic paint in the color of your choice (that matches the latex paint). I used 16 ounces of acrylic paint total, but my chair needed lots of coats.
- Sand paper in a fine grit, at least 180 (I used 220)
1. I taped off the fabric on the chair close to the legs and spray painted them white. Skip this step if you are going to leave the legs as is.

2. Mix 2 parts latex paint, 2 parts fabric medium, and 1 part water. You don't need much latex paint at all for this step. You'll definitely have paint left over. Spray down the chair until its damp, working in sections. Use the mixture as a thin glaze, painting with the grain of the fabric, to "prime" the fabric. Blend as best as possible.
I did three thin coats since I was taking the chair from such a dark color to a bright canary yellow. You might need less. Just be sure to wait the proper time between coats (check the can to see what it says)! Don't rush this part.
Here's how the chair was looking at this point, and I was wondering if I was going to have to go to Plan B of reupholstery after all:
 3. Sand, VERY LIGHTLY, on any rough parts after this phase.
 4. Then, mix 1 part acrylic paint with 1 part fabric medium, and two capfuls of water. I used 4 ounces of acrylic paint and 4 ounces of fabric medium per coat. Once you are done painting with your acrylic paint, follow the directions on the fabric medium bottle and use a hairdryer to heat set the paint, if necessary.
Because I was bringing the chair up to such a light color, I needed lots of coats of acrylic paint. Like 4. Yeah....
After Coat 1 [Pea Green]

 After Coat 3 [We're Getting There]
 After Coat 4 [Tweety Bird]. We've made it!
  But she still wasn't right. I couldn't get the acrylic paint into every nook and cranny. The edges still had a green tone to them and I wasn't thrilled with the way they looked. They made it look like I, well, had painted the chair. I wanted her to be totally seamless.
So I added a nailhead trim (also purchased at JoAnn Fabrics), which was frustrating at times, painful at others (stepped on a nail!), but totally worth it.
My grandmother's chair went from unusable....
 To gorgeous, if I do say so myself!


4 comments:
This is so boss.
(Yeah, I'm bringing back "boss.")
thanks jco! i agree that "boss" is the correct descriptor for this chair.
How does it feel? Does it feel fabricy or painty? I love it.
Well, yes and no. It doesn't feel scratchy or like its going to crack. The fabric wasn't especially comfortable to begin with so it actually feels a little smoother now. Would I want to lounge around on a Saturday in the chair? No. But I wouldn't have wanted to before I painted it. It feels more like thick canvas than anything. I bet if you used a chair with softer, low pile fabric, you wouldn't even be able to tell the difference.
Post a Comment